|
Decibel Dungeon
|
|
|
|
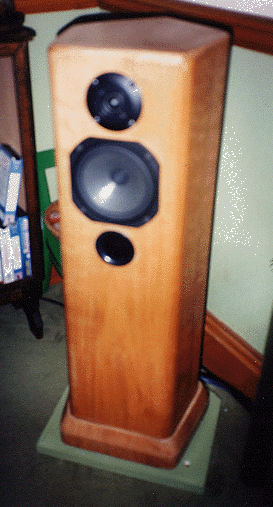
A few years ago I decided to build my own 'speakers. Without any previous knowledge of the subject, I thought that it would be sensible to rely on somebody else to do the designing. After looking through some catalogues, I chose a kit supplier who was reasonably close to where I live as I wanted to audition the 'speaker before parting with my money. I chose a comparatively simple two-way design using Audax HDA woofers and matching tweeters. If I was taking the easy way out with the design stage, the same could not be said for my construction plans. Wanting to build something different to the rectangular boxes in which most 'speakers are housed, I chose a five-sided design!
|
|
Using 25MM MDF for the main construction, I needed to cut five pieces for the 'sides' of each cabinet with angles of 50 and 60 degrees. With a hand-held power saw this was no easy matter but it all went together in the end. The finished result, veneered in Cherrywood looked very appealing but how would they sound? Fortunately, after running them in for a couple of days I noticed a huge improvement over the 'speakers I had been using before. These 'speakers remained in my system unchanged until I converted to active crossovers.
|
|
|
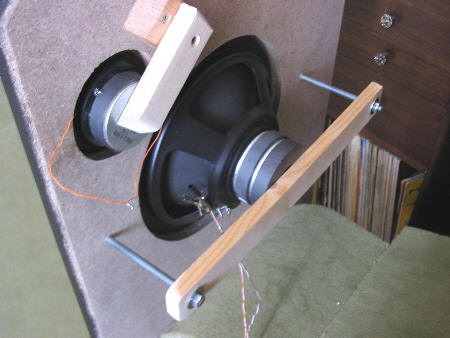
Not bad for a first attempt! The A2 kit from IPL Acoustics.
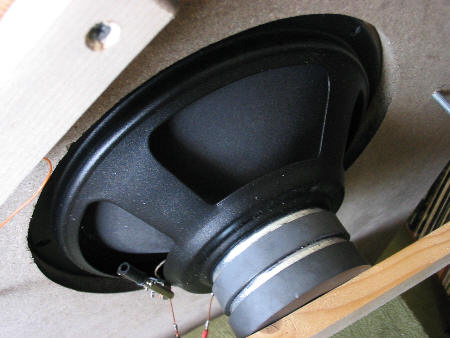
Audax drive-units.
|
|
I had been told during my research into active crossovers, that by removing the passive crossovers, the alignment may be altered, requiring a change in the cabinet volume (usually increased) and, in the case of ported 'speakers, a change of port tuning.
|
|
When I eventually installed the active crossovers, I experimented to find the optimum cabinet volume and port size. The results obtained were a volume of 34 litres compared with the 27 with the passive system which meant I could not use my pentagonal cabinets. The port also required re-tuning to suit the new alignment. Despite the need for new cabinets, going active is something which I strongly recommend.
 - when trying to ascertain the correct cabinet volume and port tuning for an active crossover conversion, build a plain box about half as large again as your existing cabinets. Use a movable base for this box so that you can easily change the volume. When you have settled on the optimum volume, you can build new cabinets accordingly. - when trying to ascertain the correct cabinet volume and port tuning for an active crossover conversion, build a plain box about half as large again as your existing cabinets. Use a movable base for this box so that you can easily change the volume. When you have settled on the optimum volume, you can build new cabinets accordingly.
|
|
(I later sold the 'five-sided' cabinets, recouping the cost of the materials.)
|
|
While doing some research on the construction of 'speaker cabinets, I had come across an article by Russ Andrews expounding the theory that the more mass you have in certain parts of a hi-fi system, the more energy is delayed (stored temporarily as it travels through the dense mass before being 'released') causing a 'time-smearing' of the sound.
|
|
He suggested a stiff but lightweight cabinet made from a combination of thin chipboard bonded to a thin layer of lightweight insulation board. I decided that the only way to see if there was any substance in this theory, was to build some cabinets using this recipe and see (or rather hear) if it was correct.
|
|
The new cabinets confirmed Mr Andrew's theory, sounding more musical than their heavier counterparts. I later took this theory to the limit when I built some more cabinets using two-inch thick polystyrene sheet. The results were the best timing I have heard from my hi-fi - it was just impossible not to tap my feet in time to the music, whatever I was listening to.
|
|
Unfortunately, I had made them the same volume as my original 'speakers so am currently using the chipboard/insulation board models. A review in Hi-Fi World magazine of the Acoustic Precision FR-1'speakers confirmed that using polystyrene for the cabinet can produce excellent results. It is probably easier to use with smaller cabinets although I had few problems producing my 28 litre floorstanders.
|
|
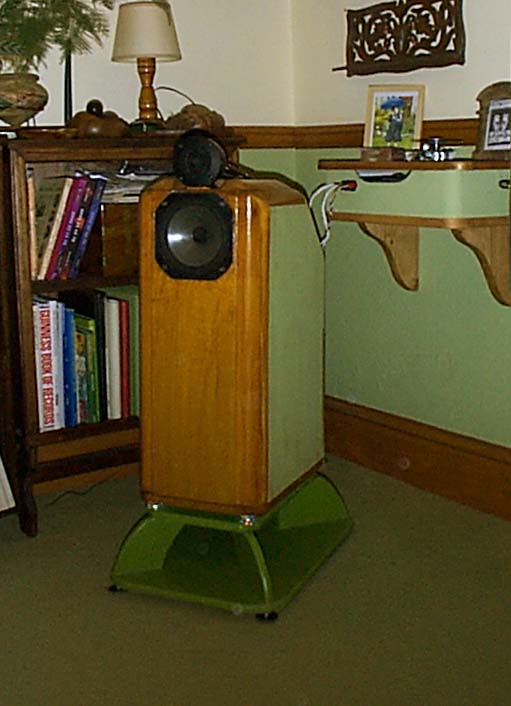
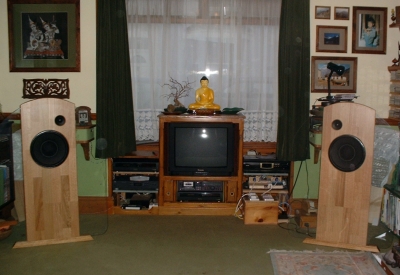
The 'A2's modified for 'active' operation
See HERE for building details.
|
|
I was surfing the net one day when I came across an interesting site devoted to 'full-range' 'speakers. One of the articles on the site was about a pair of 'speakers made by Thorsten Loesch using some 'old' Goodmans 201 drive-units dating from the 1960's. I fancied trying a crossover-less 'speaker and by one of those strange co-incidences, a pair of the same drivers came up for sale not too far from where I live.
|
|
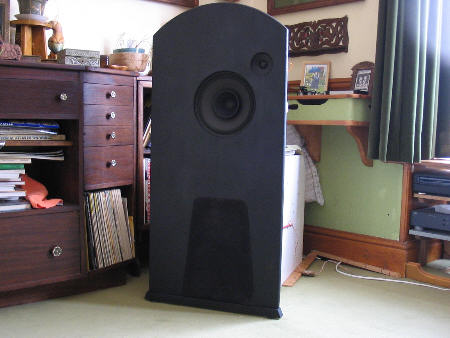
The units were in very good condition considering their age and when I got them home I contacted Thorsten for some advice on a cabinet to put them in. I eventually settled on a 'ported' cabinet which, at 110 litres, was larger than Thorstens, although nowhere near the 200 litres recommended by Goodmans!
|
|
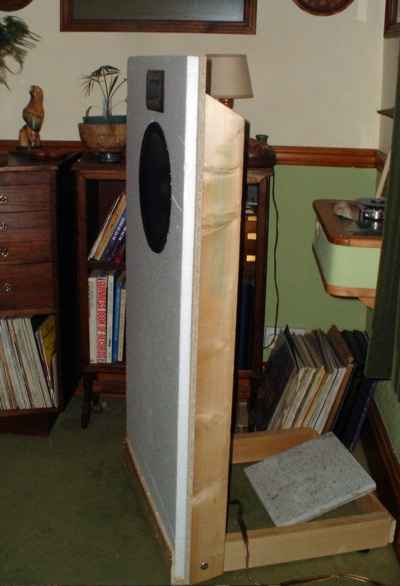
Everything then got put on hold for a while until one day I was passing a skip and found a quantity of veneered MDF there for the carrying home. I decided to use this 12mm thick board bonded to a layer of 12mm insulation board to produce as light a cabinet as I could, bearing in mind the large size. Working with available materials does limit the possibilities and the cabinet dimensions were virtually dictated by the sizes of the boards from the skip. Fortunately, the resulting cabinets had sensible proportions as regards both function and appearance.
|
|
I filled half of the cabinets with polystyrene packing chips which were held in position by net curtain material. This is meant to make the cabinet volume 'appear' larger to the drive-unit and in my design had the added advantage of absorbing the rear sound waves from the cone. I made sure that there was plenty of bracing which is particularly important when you have a cabinet with larger panels. The ports were fitted in the base of the cabinets, firing downwards, an arrangement which I feel is the optimum for 'ported' designs, based on much experimentation. Of course, the cabinet will need to be supported so that the port is not blocked but as I use stands for all my 'speakers, this is no problem.
|
|
Having built the cabinets and installed the drive-units, I had just about enough strength to carry them into a spare room where I have an old hi-fi system which I use for experiments. Even perched on temporary, wobbly stands, and fed by a very old and basic CD player, through an amplifier which is over 20 years old, the Goodmans sounded really great, right from the first track I played through them. There is something about listening to a loudspeaker without a crossover that seems to put the listener in closer contact with the music and I found that I just couldn't stop listening to them.
|
|
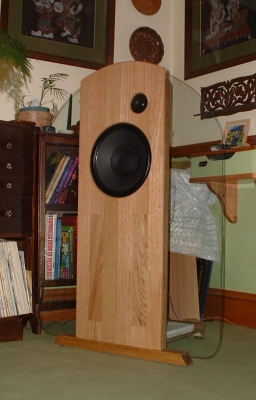
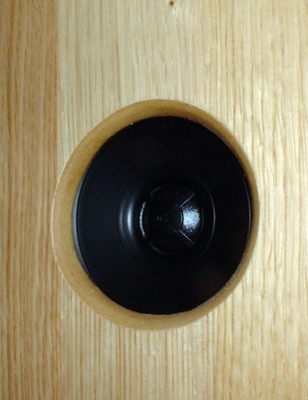
The Goodmans drive-units start rolling off at about 12khz and again following Thorsten's lead, I decided to fit some piezo tweeters to extend the frequency range up to 20khz. I bought a pair of the dual bullet designs (Motorola LO54L) and fitted them into separate housings which just sit on top of the main cabinets. Although my hearing probably doesn't go too far past 12khz, I can easily hear the difference that the tweeters make.
|
ROLLING OFF -Ideally, every frequency should be reproduced at the same volume to reproduce an accurate image of the sound being played. Drive-units are designed so that they have a (relatively) flat range between two frequencies. (No drive-unit can cover every frequency). At either end of the 'flat' frequency band, the output from the drive-unit drops away, or'rolls off'.
|
|
I have since made up some matching stands and will soon be trying out these 'speakers in my 'main' system which should reveal exactly what they are capable of. My only reservation is whether I can live with the physical size of these 'speakers but there's only one way to find out! Watch this space for a review.
|
|
|
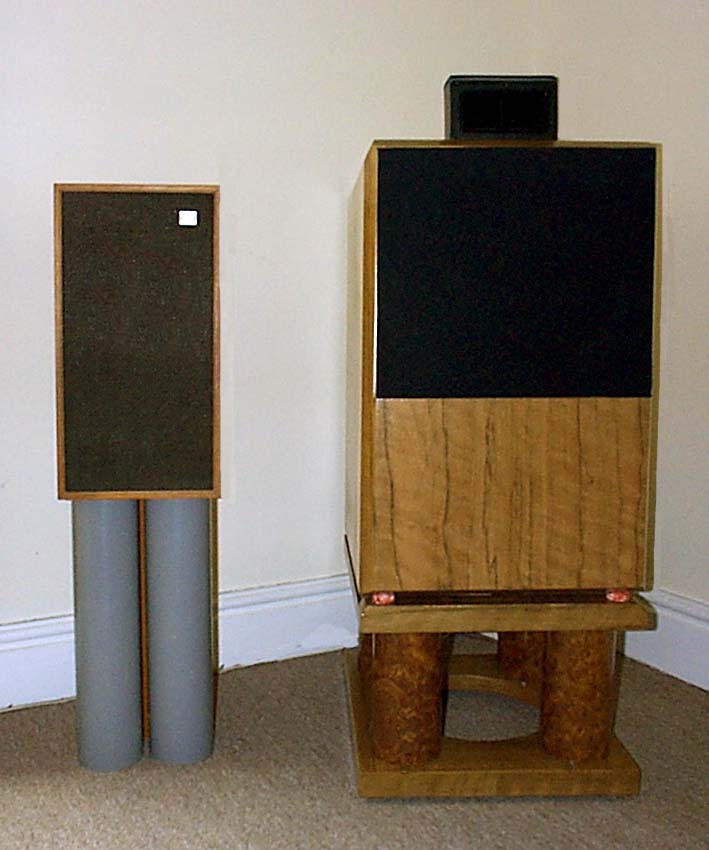
My full-range 'speaker dwarfs a Wharfedale Linton! The 'dual bullet' piezo tweeter sits in its own housing on top.
|
|
Update 20-5-01
At last, I have finally got around to setting the 'Fullrangers' up in my listening room, fed from my modified CD player and Arcam A60's (using one channel of each amp).
|
|
The very first thing I had to do was turn the volume control down quite a way. These babies are VERY efficient and would make ideal partners for a lower power valve amp. After a little while to adjust from the sound of my active system, I realised what a good pair of 'speakers the Goodmans are. First off I noticed the sound stage, quite large with the actives but simply filling the room with the Goodmans. It extends not just between the 'speakers but well outside them as well. There is slightly more depth with the actives but it is by no means shallow with drums coming in well behind the lead singer. The 'punch' from drums is really impressive, not over-powering but enough to give you the 'being there' feel. Metallic sounds are just that and the transients, wow, and I'm used to listening to an active system! Not surprising though with no crossovers between amps and 'speakers. The overall sound is very cohesive, again probably due to the lack of a crossover. The 'speakers are definately euphonic with a big 'E'. I constantly found myself putting on test tracks and then (unintentionally) listening to the rest of the album.
|
|
When you consider that these 'speakers don't require a crossover, passive or active, and that they only require one amp per channel, they become a very attractive alternative to active systems. I shall certainly be recommending them as a serious option for hi-fi systems.
|
|
About the only negative I can find is the one that I expected. These physically large 110 litre giants completely take over the corners of my 4 metre by 4 metre listening room, almost defying anyone to displace them. They definately need, and deserve, a larger listening room so very reluctantly I shall be putting them up for sale. The whole exercise of building them has been to find out how good a full-range 'speaker can sound and if the results from the Goodmans are indicative, then this won't be the last pair that I build. For now, I reckon that I can live with the size problem for a little longer before I come to do the 'dirty deed'. (or should I consider moving home?)
|
|
Update 7-10-01
Six months on, I have decided to tolerate their size and keep the Goodmans 'speakers. Their sound is so good I am reluctant to part with them. And if I decide to go with them permanently, the prospect of finding just two top class monobloc amplifiers instead of the six I would need for my planned active system, is another big plus in their favour. Thank goodness nobody came to buy them!
|
|
Update 5-10-03
Well, last year I moved a power lead, there was a nasty noise from the 201's, and one of them was 'dead' (yes I should have turned of the power to the amps FIRST). So I bit the bullet and got Dave Smith to rebuild them for me. Dave did a first-class job on them and consequently I have a pair of 'as-new' Goomans 201s!
|
|
Since they came back I have been using them in the ported cabinets but this week I built some rough-and-ready open baffles for them as you can see below.
|
|
The size of the baffle is 24 (1220mm) inches wide by 48 (2440mm) inches tall.
|
|
|
|
The big surprise is that I don't notice any reduction in the bass with the baffles compared to the ported cabinets! After a few days of listening I do prefer the open-baffles which sound slightly more natural. And the baffles took just six hours to complete compared to two weeks or more for the cabinets. (And cost just 7UKP for materials)
|
|
Of course, the size is very noticeable in a smaller room like mine but if I keep the open-baffles, then I will rebuild them with a narrow wooden centre panel to hold the drivers, and glass 'wings' to make up the rest of the baffle. Watch this space.
|
|
Update 29-10-03
After a lot of experimenting with the open baffles I am now very happy with the sound, especially since bringing the valve-buffered Gainclone into the system! I have moved the drivers about nine inches (225mm) down the baffle and removed the 'wings'. I found that closing any gap between the baffle and the floor keeps the bass levels up. After changing the position of the baffles many times, I now have them about 30 inches (90cm) from the rear wall and about 24 inches (600mm) from the side walls. Now it's a question of building some permanent and cosmetically more pleasing baffles from glass.
|
|
Update 01-02-04
I now have my 'new' open baffles, constructed of a solid centre panel which is augmented by glass 'wings'.
|
|
After living with the solid four foot by two foot panels for quite a few months, the new baffles seem tiny and really open up my room.
|
|
|
|
The baffle centre sections are constructed from 18mm thick chipboard (particle board) which is 'veneered' with 6mm thick flooring which has a real oak finish.
|
|
I started by cutting out 9mm rebates along the long front edges of the chipboard (using a hand held circular saw). I wasn't sure what thickness glass I would be using but was not worried about making the recess too big as the glass is clamped to the front of the baffle by nylon bolts.
|
|
Next the holes were cut for the drivers, remembering that they were to be inserted from the rear so the whole circumference had to be allowed for.
|
|
Some strips of solid timber (a sort of oak) were attached to the rear edges (to strengthen the baffles) and then the nylon nuts were 'sunk' into the chipboard. I tried burning the recessess with a hot metal bolt but the chipboard has some sort of fire resistance and this didn't work as well as it had done in a test with a piece of pine. I ended up carefully doing the holes with a router.
|
|
After inserting the nylon nuts and bolts, the flooring is then glued to the chipboard so that it forms a slot on either side of the baffle. The apertures for the drivers are then cut out using a Rotozip and the edges all rounded with a router. A strip of veneer finishes off the top edge of the centre section after it has been shaped with a jig saw.
|
|
The drive units are actually mounted from the rear as can be seen in these two pictures. It makes for a very neat front baffle and I can hear no degradation to the sound.
|
|

|
|
The bottom rail has slots cut in it to coincide with the slots in the baffle and the two are then screwed together.
|
|
Eventually, I hope to have a dipole woofer on a W baffle immediately behind the main baffle which will double as a support. But for now, I have made a simple frame (just seen in the above picture) which keeps them upright and steady.
|
|
These new baffles are some six inches shorter than the protoypes, and a few inches wider. However, I detect a slight loss of bass although this doesn't worry me too much as I will be adding a woofer system as the next stage of my 'speaker development. If I was building these again, I would make them a bit taller!
|
|
So what are the advantages of this style of baffle over a one-piece glass or Persepx type? Well, for storage and moving, they come apart very easily. But best of all, they cost far less. I was lucky enough to get my glass for nothing thanks to a friend calling in a favour with our local glaziers, and the rest of the materials cost me around 25UKP. Compare that with the glass or Perspex needed to make a similar sized pair of baffles which still need some sort of centre section behind the glass to hold the driver(s). Glass of course won't yellow like a plastic although it is slightly more breakable. However, with these smaller pieces of glass, breakage will hopefully be less likely. Which looks best? I'll let you decide!
|
|
|
|
Update 29-11-04
I have now completed the woofers that augment the bass output down to around 20 Hz. For full details click here.
|
| Site menu
Page menu
|
|
|
Open Baffles Mk II
While reading the various loudspeaker forums on the Internet, I had heard very good reports about another full-range driver said to be very suitable for use on open-baffles. This driver is the Ciare 250, a 10 inch dual-cone unit that I believe was originally designed for use in cars. The unit is available (in Europe) from Spectrum Audio in Germany. Fortunately, it is very easy to order from them so I eventually took the plunge and ordered a pair of Ciares together with an extra pair of magnets. I received the drivers within three days of placing my order. (Total cost including shipping was 131 euros)
|
|
The Ciare 250 driver (shown with extra magnet).
|
|
The first thing that I did with the Ciares was to connect them up to an amp and tuner and play music through them for about 18 hours a day for four days to help break in the cones. Then it was time to think about what to do with them. I had originally thought about fitting them into my existing baffles but when I came to do it, I realised that it would be a trickier job than I had envisaged so I decided to make new baffles.
|
|
This time I was starting off with the subwoofers so I knew that I didn't require such a large baffle. I had reduced the width of the 201 baffles to 55 cm and decided that would be a good starting point for the Ciares. I kept the height the same (110 cm), and the height of the driver (76 cm to cntre) but offset it slightly more. As before, I used 22 mm chipboard for the baffle but this time I chose plain 6 mm MDF for the facing. By cutting a hole ion the chipbpard for the driver and another slightly smaller one in the MDF, I landed up with a recess into which the driver sits. Last time I made clips to hold the 201s in place. This time I decided to try something different - a bar across the rear of the driver back-plate. In theory this should have several advantages over clipping the rim of the speaker. To hold the bar in place, I used two lengths of 6 mm threaded rod that is screwed into the baffle (after drilling and tapping), and a couple of nuts and washers.
|
|
If you use the bar clamping method, do not over-tighten the nuts or you could easily squash the drive unit! Finger tight is fine and safe.
|
|
Clamping bar holding Ciare drivers in place on open-baffle.
|
|
You can see from the pictures that I also made provision for a tweeter but so far I have not found the need for one and I don't think that I will. Still, it was easier to make the holes while contructing the baffles, than trying to add them later. I consider these baffles 'test' items!
|
|
Matt black paint was the budget option for these test baffles.
|
|
How do they sound?
Well of course, it is natural to make a comparison with the Goodmans 201s but I have to remember that the Ciares require quite a lot of breaking in. At present, I prefer the 201's but I can remember that they didn't sound anywhere near as good when I first used them after their re-build. So at present, all I can report is that the Ciares do have a better top-end, hence no tweeter. They go plenty low enough and I have not changed the crossover point on the subs (although I will do some measuring in the next few days). The Ciares definitely sound better to my ears with the extra magnets attached. These alter the alignment of the drivers and give them more detail in the middle and higher ranges. If you are using the Ciares on their own, the trade-off with the extra magnet is that the Qts is lowered and you may therefore hear a loss of bass. With the subs, this is not a problem for me. I will write more about the Ciare open-baffles when the drivers have had time to break in properly.
|
|
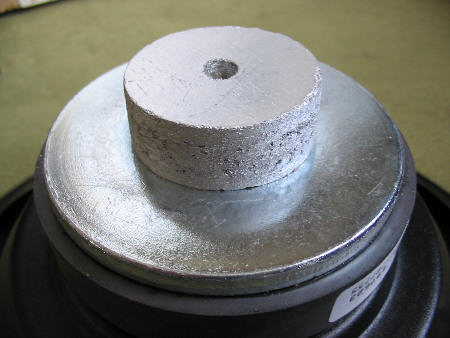
Adding the second magnets.
I decided to make a little mod to help me quickly add and remove the extra magnets from the Ciare drivers. This simply consists of a boss (MDF) drilled through the centre and with a T-nut inserted such that a bolt can be screwed into the boss. The boss is then glued to the backplate of the driver. If necessary, the extra magnet can then be bolted to the boss and backplate. With the present arrangement of the 'clamping bar', it isn't necessary but I want to try a different arrangement and it will be necessary to secure the extra magents without the bar.
|
|
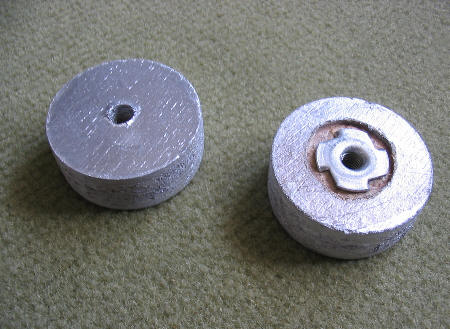
The bosses with T-nuts.
Bosses glued to backplates.
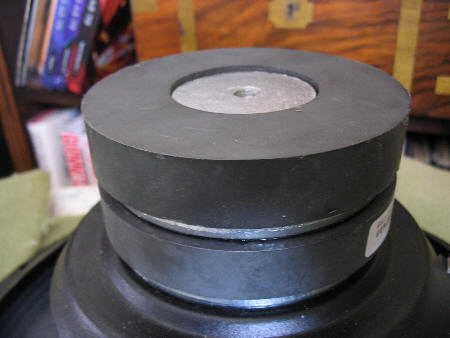
Extra magnets in place (but not bolted in).
|
| Site menu
Page menu
|
|
|
|
|