Introduction.
Getting started.
Case modification
The important bit.
Puckering up.
Plastic surgery.
The verdict.
Digital index page.
Hung up on DIY hi-fi?
Then welcome to

The Decibel Dungeon project
Mechanically modifying the Philips CD723 CD player.
Click HERE for the electronic modifications.
![]()
![]()
Decibel Dungeon
Introduction
By way of providing instructions for assembling a complete hi-fi system, I am going to give details for modifying a CD player (rather than building one which is beyond many experts, never mind novices).
Which one?
The CD player which I have chosen for this project is the Philips CD723, available here in the UK for about £65. (See the Richer Sounds site). At the price, even if something goes disastrously wrong, it's not exactly the end of the world! Apart from it's price and wide availability, it is comparatively straightforward to pick up a service manual for the CD723. You could choose another CD player to modify as most of what follows will apply equally well to most models with conventional transports. I'll leave the choice up to you but I can say that the results of my CD723 conversion are very good.Connect Business Park
Bordesley Green Road
Birmingham
B9 4UA
England
Tel: 0870-6000-271
E-mail Willow Vale
Or click HERE for their web site.
Apparently, Willow Vale have not been contactable recently so I am indebted to Mike Mears for locating another source, namely Dutch West Distributions, tel - 01434 32 32 32. The manual appears to be slightly cheaper from them.
Now comes the fun part but before you begin, a few words of advice.- This isn't too difficult a job even for complete novices. However, you should take things very slowly and above all, handle the parts of the CD player, particularly the transport, very carefully. It is easy to damage the tiny wires connecting the laser sled to the PCB.
- If you want to separate the laser sled from the transport PCB, take note of the advice in the service manual and short both the mylar connector and the input socket on the PCB. I did manage to complete the job without the need to separate the sled from the PCB.
- Check each part as you go to make sure it fits the others.
- If you use MDF as specified below, make sure that you take precautions to prevent breathing in the dust. Work outside if you can and always wear some sort of filter mask and eye goggles.
Getting started - getting in
You will need a T10 screwdriver for most of the disassembly work on the CD723 which consists of the following steps:- Remove the seven T10 screws which secure the lid to the rest of the casing and remove the lid. Remember to have a suitable container to keep all the screws and other small parts in so that you don't lose any.
- Disconnect the wire coming from the transport PCB to the chassis, the ribbon cables between the transport PCB and the power supply PCB. Remove the two screws securing the whole transport assembly to the chassis and carefully remove it from the case. Now, carefully note the vertical distance between the laser sled and the PCB. Also make a note of their relative position as you will need to make sure that the same relationship is maintained after the conversion.
- Disconnect the cable from the transformer to the power supply PCB and remove the transformer from the case. The transformer will be rehoused in its own case, thus remove the vibration it creates from the immediate vicinity of the transport.
- Remove the two screws holding the power supply (AF) PCB to the rear of the case and the one securing it to the base. Disconnect the cables which connect the PCB to the control panel PCB and the headphone PCB. You can now remove the power supply (AF)PCB from the case.
Out with the soldering iron
Now a little bit of work on the transport PCB, but don't worry, it's not very difficult. However, a word of caution is in order here. The PCB has VERY thin and delicate tracks so be extra careful when making modifications to it.- Separate the PCB from the tray assembly by removing the small screw next to the tray motor and unclipping the PCB from the lugs at the rear of the assembly.
- First desolder the two wires which run from the PCB to the tray motor. As you won't be using the tray, these won't be needed. The wires are right on the edge of the PCB and easy to get to with the 'iron'.
- Locate the little microswitch on the front left of the PCB (part# 1850). Desolder it and remove it from the PCB and PUT IT SOMEWHERE SAFE.
Modifying the casing
A little bit of metalwork
The case can now be modified as follows:- Taking the power supply PCB, place it in the case so that the digital output appears in the aperture that the line-out sockets originally occupied. Now mark on the case where the line-out sockets are and carefully cut out two holes for the phono sockets and one smaller hold for the retaining screw. When you have done this, temporarily screw the PCB into the case. There is a hole on the opposite side of the PCB. Mark where this comes on the bottom of the case, remove the PCB and drill a hole to accept a bolt, the same diameter as the hole and about 20mm long. Place the bolt in the hole facing upwards and secure with a nut. Make a small spacer to fit on the shaft of the bolt and of a suitable thickness that when the PCB rests on it, it is in a level position. Test this by installing the PCB and then remove it again to somewhere safe.
- Take the lid off the case and cut a triangular shape to accommodate the line-out sockets.
- The transport PCB needs a new connection point to the case so drill a hole to accept a small bolt. The hole should be about 100mm from the back and right hand side of the case as you look at it from the front. Bolt a ring terminal to the case which has been filed down to accept the receptacle on the lead from the transport PCB.
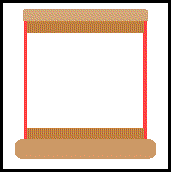
- Cut a rectangular aperture 210mm by 210mm in the centre of the lid of the case. Fix 'Flashband' to the top of the case lid as you did on the base and then screw the lid to the damper panel.
 - Drilling slightly larger holes in the lid than the shaft of the screws will allow for some final adjustment.
Next some MDFwork
- Remove the four plastic feet from the base.
- Construct a plinth to go on the base of the case. This is made from three MDF sheets 430mm by 260mm, two of which are 3mm thick and the other 12mm thick. The 12mm thick piece is cut to the pattern shown below.
The spacing around the rectangular cutouts is not too important but don't weaken the panel too much by removing too much material. The circular holes should be the correct diameter to accept some foam pipe insulation which is usually around 40-45mm diameter. Use the 12mm panel as a template to mark out and then cut the circular holes in ONE of the 3mm panels. The plinth is built by glueing one of the 3mm panels to the 12mm panel, filling the rectangular cutouts with dry sand and then glueing on the other 3mm panel. Do not pack the sand in too tightly, it should be able to move freely. If you wish, rout or sand a radius on all edges. Place the CD casing on top of the plinth and mark the places where you need to rebate the plinth so that the casing sits flush.
- Place 'Flashband' (a self-adhesive bituminous sheet material) or a similar product on the base of the casing. Don't bring it too close to the edges as you don't want it visible. Then screw the case in place on the plinth. Cut some pipe insulation about 25mm long (length is not too critical but make sure that they are cut square and all the same length). Paint these black (or another colour if you wish) and place them in the circular holes. The fit should be tight enough so that they stay in place without glue.
- Build another MDF/sand sandwich to go on the lid of the player. The three panels are identical in size to those used for the base plinth. The pattern for the middle panel is shown below.
The rectangular cutouts are not too critical but don't make them too big so that the panel is weakened. The 3mm panels must have circular cutouts, one with a 160mm and one with a 180mm diameter hole. The centre of these circles is the same as for the 160mm cutout in the 12mm panel, ie they are all centred. Construction is as for the base plinth.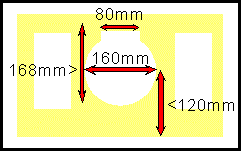
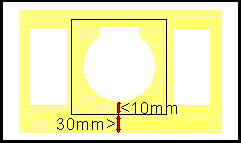
- Cut another rectangle of 12mm MDF 200mm by 200mm with a cutout to match the damper panel. Screw this in position as shown in the diagram below.
- Check that the case lid/damper panel fit correctly on the case and make any necessary adjustments.
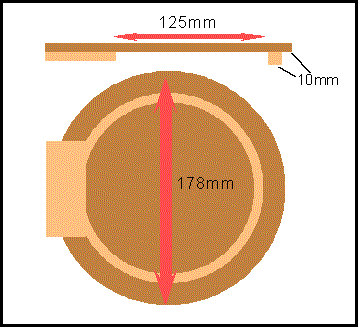
- Make a 'cover' for the aperture based on the design below.
- There are six wires, two of which are red and two of which are white. I am not sure if it is OK to interchange wires of the same colour (perhaps somebody could let me know) so to make sure that we don't get any crossed wires, use a marker pen to mark one white and one red wire with a series of dots or dashes.
- Cut the six wires about half way between transformer and PCB. Strip back enough insulation on all the cut ends to allow you to solder new wire to them.
- Solder the new wires to the wires going to the PCB connector and insulate the joins with some electrical tape. The length of the new wires will depend how far you want to move the transformer away from the CD player but don't make them too long. You don't want a long 'arial' to pick up more RFI!
- Twist or braid the new wires together and slip on a suitable length of heatshrink tubing, sliding it as far as you can to the PCB connector.
- Solder the new wires to the wires on the transformer and insulate the joins. Slide the heatshrink tubing back so that it covers both sets of joins and then shrink it.
The important bit
Having warmed up our DIY skills on the case-work, we can now start work on the internals. There are many options for mounting the laser transport sled but after a little experimenting I have found the following method produces very good results.- Take a piece of 6mm perspex 200mm by 200mm. I was lucky enough to find a piece in a skip but a supplier of plastics should have some offcuts you can buy. Using a drill and coping saw, cut an aperture in the perspex like the one in the diagram below.
Remember that this is based on my design with the 'Shortloader' transport and others may have slightly different dimensions. As a starting point, the centre of the disc motor should coincide with the middle of the perspex, 95mm in from the front edge. Go carefully checking with the sled to see that you get a good fit. Mark four holes for some self-tapping screws and drill appropriate holes in the perspex.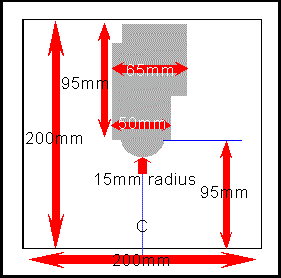
- Temporarily mount the laser sled in the perspex mount, turn the whole thing upside-down and align the PCB so that it is in the same position relative to the laser sled that it was when they were both in the tray mount. Make three or four 15mm long spacers from 15mm diameter dowel and glue them in appropriate positions on the perspex. The PCB can then be screw to the dowel pillars through the two screw holes provided.
- Make two lugs from the 15mm dowel about 10mm in length. These will locate in two 50mm lengths of foam pipe insulation which provide support pillars at the rear of the perspex platform (looked at from the front of the player). Do not fix these lugs yet.
- Cut two lengths of pipe insulation, 50mm long and two disks of 3mm MDF the same diameter as the insulation. Drill holes in the centre of the disks to accept some small bolts. Now cut an extra length of pipe insulation 53mm long to use as a temporary 'pillar'. Place the perspex in the case using the three 'pillars' with the temporary one at front centre. You may not be able to locate the rear pillars symmetrically due to the shape of the base of the casing but get as close as you can. The perspex platform should be positioned so that the centre of the laser sled is centred in the aperture in the lid of the case. Draw around the rear 'pillars' and mark the positions of the top of them on the perspex. Remove the platform assembly, place the 3mm discs in the circles you have drawn on the base and mark the position of the holes for the fixing bolts. Drill appropriate holes and bolt the disks in position.
(The MDF disks are required because I find that nothing sticks satisfactorily to the metal of the case) - Take a length of M6 threaded rod about 120mm long and grind a sharp point on one end. With the case fixed in position on the plinth, drill a 7mm hole through the base and plinth to accept the threaded rod. This hole should be mid way along the width of the case (there is a convenient groove to mark this place on the CD723), and about 50mm in from the front of the case. The idea is that this rod will be positioned fairly close to centre of the perspex platform (but without getting in the way of the PCB). Fabricate a support to keep the spike vertical and fix it to the base of the casing.
- Glue the two rear pillars to the 3mm disks. Glue the 15mm lugs in position on the underside of the perspex platform. Hotmelt glue is ideal for this job.
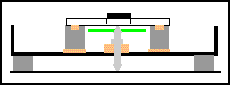
- Place the casing/plinth structure on a flat surface with a hole immediately beneath the 7mm hole for the threaded rod. Place the rod through the 7mm hole using a nut to stop it falling right through. Place the perspex platform on the three 'pillars' and adjust the nut until the platform (resting on the spike) is parallel with the base of the casing. (see diagram below) Carefully mark where the rod goes through the hole underneath. Remove the rod and cut it to length and grind a point on that end. Moving the casing to a flat surface, the spike should sit flush on the supporting surface while keeping the perspex platform level. Adjust the nut on the spike to keep in the correct position.
- Assemble the laser sled and PCB onto the perspex platform and mount it in the case. Fit the lid/top panel assembly and looking at the circular aperture from above, mark the 'seven o'clock' position in the middle of the 10mm rebate. Carefully drill a 3mm pilot hole through the top panel and into the perspex platform.
- Remove the lid/top panel and open up the pilot hole to about 8mm. Enlarge the first 15mm of this hole to 15mm diameter. Now open up the 3mm hole in the perspex to 8mm.
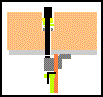
- Construct a small PCB to hold the microswitch from the transport PCB. Mount the switch on the new PCB together with a two pin PCB connector (I got mine from a defunct VCR). This PCB is then mounted on the underside of the perspex platform using the bracket so that the switch is immediately beneath the 8mm hole (see diagram below).
- Make a plunger. Mine was made by turning down a piece of dowel which was held in the chuck of my drill and shaped with a file and sandpaper. A screw cup is placed over the narrow part of the plunger and a suitable spring fits inside it. A suitable sized washer sits at the bottom of the 15mm hole and the spring presses against it. The spring should allow the CD flap to close all the way but be strong enough to release the pressure on the microswitch when the flap is lifted. The plunger protrudes above the surface of the top panel such that it is pressed down when the CD cover is in the closed position. You will probably need to experiment a bit to get this just right.
- Solder two wires between the plug which connects to the microswitch PCB and the transport PCB (where the switch was originally located).
Puckering up.
Remove the puck by flexing its' holder and sliding it out. If you place it in position over a CD you will notice that it is able to slide about, requiring it to be positioned exactly in the centre. I overcame this problem by sticking four 3mm squares of sticky-back felt on the sloping sides of the depression. I reckon the puck needs to be a bit heavier and at the moment have the recess between the top and bottom plates filled with plasticine. Whatever you do to modify the puck ensure that it is balanced when you finish. Also ensure that if you use a bigger puck that it does not obstruct the lid of the player when it is closed.IMPORTANT - I experienced a problem with the player taking ages to read the directory track and then find the start of the CD. After checking out that there were no obvious problems like something physically impeding the free movement of the laser carrier, I realised that the CD was able to slide between the drive and the puck. I'm now using a tiny amount of bluetack to prevent this and the problem has gone away completely. Other solutions which I have yet to try are adding weight to the puck and building a different design of puck, perhaps covering the whole of the CD.
Nearly finished
If I haven't forgotten anything, you should now be able to reassemble the CD player and try it out. Before remounting the laser sled, I would recommend covering the perspex platform with some sticky-back felt. I've also used this on the underside of the flap which covers the CD. It all helps to make it look better and keep things as quiet as possible around the transport mechanism (which can't be a bad thing). When you have got it all working properly, you can disassemble it and paint it. I have used a satin black car spray paint with some speckles of metallic gold but you can have any colour scheme you wish.Fixing the looks with Plastic Surgery.
I took the aesthetics thing one stage further. I think that the fascia of the CD723 is quite ugly as it comes from the factory. I removed the front panel (not at all difficult) and after glueing in a strip of perspex to block off the aperture where the CD draw was, I filled the large semi-circular groove with car body filler. I also resprayed the display surround and smaller buttons gold. The panel was sprayed to match the plinth and top panel. The overall result of these cosmetic alterations is a rather good-looking machine (IMHO).The verdict.
I have now had two people listen to my modified CD723 and both have confirmed my findings, ie it is a big improvement on the original configuration. All of us have noticed the better detail, larger sound stage and much less digital sound. One of my visitors said it was a very 'sweet' sound which I can't argue with. Given that this player is still using the very basic power supply, DAC and analogue output stage, I am extremely impressed. You have got to try this one for yourself.Last update: 7th October 2001 Decibel Dungeon - Copyright © 2002 Decibel Dungeon - Author Nick Whetstone