|
Decibel Dungeon
|
|
This is one of the first questions that arises (or should be) when anyone is considering the possibility of building or modifying their own electronic equipment (particularly if it is to be mains operated), so let's answer it first.
|
|
There are two issues here, personal safety, and damage to property, either the equipment you are building, the equipment which it is connected to, or God forbid, damage to your home.
|
|
There is virtually no danger of death or injury while you are building or modifying an electronic project. The potential danger comes when you connect the item to an electricity supply if you haven't strictly followed all the rules on safety. However, if you make sure that you have properly grounded any part of the equipment which could become live (especially metal casings), there should be no danger of electric shock when operating it.
|
GROUNDING - Connected to 'earth' so that any electrical current is conducted straight to ground, rather than through something else like you. (Due to the ground connection having a lower impedance which currents 'prefer' to flow through).
|
|
Sometimes you may need to test parts of a circuit while it is operating. This will necessitate having the case open. Again, providing you have followed the rules on grounding, and have correctly insulated any parts of the equipment carrying high voltages (particularly the power supply section), you should not encounter any safety problems.
|
|
As regards damaging the equipment (or anything which is connected to it), the answer is once again to make sure that you have done everything correctly. Here is a list of safety checks which you should carry out at least twice before you connect up anything you construct to a power supply:
|
|
Make sure that you have installed the correct fuses or circuit-breakers in the correct locations.
If you designed and made the PCB, make quite sure that it is correctly laid out. Make sure the tracks are not broken an that there are no unwanted connections.
|
PCB - Abbreviation for Printed Circuit Board. The board on which electronic components are mounted to build a circuit.
|
|
Check all your soldered joints and make sure that you have not created any 'solder bridges' between parts of the circuit which are not meant to be connected to each other.
|
SOLDER BRIDGES - An over-application of solder that has flowed across two or more tracks causing an unwanted connection between them.
|
|
Make sure that there is nothing in the equipment which could cause a short circuit. eg a piece of wire or leadout.
Make sure that all the components have been inserted into the correct locations.
|
LEADOUT - the wire connection (usually two or three) coming from an electronic component which is soldered to the PCB (or sometimes to another leadout) to connect the components.
|
|
Where relevant, make sure that components are inserted with the correct polarity.
Check that all components are rated for the voltage in their part of the circuit.
Before connecting a power supply to the rest of the equipment, measure its output voltage to ensure it is as expected and specified for that circuit.
|
|
Always test any new or modified piece of equipment before connecting it to other parts of your hi-fi system. Check that there is no DC voltage on the output terminals. The (music) signal will be AC and you should not be able to measure more than a few millivolts of DC with your multimeter.
|
|
Don't be frightened off by all this talk of safety. While it is a very important consideration of DIY hi-fi, I should say that in four years, I have had no major disasters. That's not to say that, like most people who build or modify electronics, my heart doesn't flutter a bit each time I first power up something I've just built, and if you don't feel the same, then you probably aren't giving electricity enough respect!
|
| Site menu
Page menu
|
|
|
|
|
Apart from the safety issues which I hope you have now read about, the other important consideration when modifying a piece of hi-fi is, IS IT STILL UNDER GUARANTEE? If it is, and you make any modifications, you will almost certainly invalidate that guarantee. It's your equipment so think carefully before diving in.
|
|
Just about anything made by man can be improved in some way, given more thought, time, effort or funds. When items like hi-fi are produced commercially (ie to make a profit), they have to be built to a set price. Even so-called 'top-of-the-range' products will have a limit on how much the designer can allocate for parts and labour.
|
|
So it's most likely that many of the components in your hi-fi system can be improved, usually by replacing some of the components with more expensive (and presumably better) items or altering the actual design. However, before you rush out and buy the most expensive resistors and capacitors you should realise that if the basic design of a circuit is flawed, then no amount of fancy components will make it a good one.
|
AND PRESUMABLY BETTER - More expensive does not always mean better with hi-fi components. It's easy to get 'sucked in' to the hype about some components as they come into fashion, or as a supplier promotes them with exaggerated claims. VERY few components can improve the sound a great deal on their own so ask yourself if they are worth their cost compared to a standard item which may cost just a few pence!
|
|
So the first thing you need to do when considering any upgrade to any hi-fi electronics is to find out if the piece of equipment concerned is good enough to warrant the expense, or whether you will just 'be throwing good money after bad' and landing up with something which doesn't sound any better than before you started. There's really no substitute for good and reliable advice here. Ask around, check the internet. You need to know:
|
|
- Can you contact the service department of the manufacturer?
- Can you find someone else who has modified the same piece of equipment?
- Can you get hold of a review of the piece of equipment? (Be warned though, that these aren't always 100% reliable).
 - Unfortunately, much hi-fi is produced by small companies who come and go, often in a short space of time. For this reason, it may not be possible to get in touch with the original manufacturer. If this happens you may find that an individual connected with the company is still in the hi-fi business. Ask around, it may be possible to locate that person and get the information you need. - Unfortunately, much hi-fi is produced by small companies who come and go, often in a short space of time. For this reason, it may not be possible to get in touch with the original manufacturer. If this happens you may find that an individual connected with the company is still in the hi-fi business. Ask around, it may be possible to locate that person and get the information you need.
|
|
Whatever you do, make sure that the item that you want to spend time and money on is worth the effort before you begin.
|
| Site menu
Page menu
|
|
|
|
|
Ideally, you should have some sort of plan in your mind when you start to modify any hi-fi.
- Think about how much you are prepared to spend.
- Find out which parts of the equipment will respond best to upgrading.
- Consider what skills and equipment will be needed and whether you will be able to do everything yourself.
- Decide how much you will do at a time.
There is a golden rule that you should only do one modification at a time, listen to the difference that it has made, and then do another. In practice, this isn't always practical as replacing a single component can often involve an hour or so of dismantling to get to the component and only a few minutes to replace it. For that reason it is very tempting to replace a number of components while the item is dismantled.
You will have to decide what you want to do but remember, if you change more than one thing at a time and find that the sound has got better (or worse), you won't know which of the modifications you made is the cause!
This TIP in the 'Getting to the components' section will help solve this dilemma.
|
|
Assuming that you either know what you want to do or can get instruction from somebody else, it is also a good idea to work out what components you will need.
|
|
You should then price up the whole modification if only to make sure that the finished job will be cost effective. It is easy to get carried away and be obsessed with putting in the so-called 'very best' components and land up with a piece of equipment which has cost far more than you would have paid to buy something with a similar, or even better sound quality.
|
|
There is a lot of talk amongst audiophiles about component sound quality. Rather like whispers, the rumours of some components get exaggerated until the less knowledgeable believe that it is absolutely imperative to use them. That there is some difference in sound quality between various makes and specifications of electronic components there is no doubt, but whether the improvement justifies the huge price difference is less clear cut.
|
|
Whether you are going to just replace components, or alter the actual circuit design, you will have to acquire the relevant circuit diagrams and/or maintenance manuals for the piece of equipment that you are modifying. For more details on this go the 'Getting started' section.
|
| Site menu
Page menu
|
|
|
|
|
Before you can remove and replace any components in an amplifier or similar piece of hi-fi equipment, you will need to be able to gain access to them. This involves some dismantling of the equipment. Remember before you start to dismantle any electronic equipment to switch it off and disconnect it from the mains supply. Also be warned that some capacitors (especially those in the power supply) can and will store an electrical charge (like a battery). This charge will dissipate over a period of time but you should be aware that for sometime after disconnecting the power, some parts of the circuit may still be capable of giving you a nasty shock or damaging parts of the circuit if a short circuit occurs.
|
|
- Before you start to dismantle anything, have ready a suitable container for all the small parts which you remove. An ice cube tray or an egg box, both of which provide separate compartments are ideal for this purpose. Also keep to hand a notebook and pencil, so that you can write down a description of each stage of the dismantling process. This will help you put everything back together in the correct location and order later on. Don't assume that you will remember this later.
|
|
It is usually (but not always) obvious which screws need to be removed in order to remove the lid or sleeve from the equipment. Some modern equipment has been made deliberately awkward to dismantle in order to stop access for anyone but authorised service technicians. However it is most unlikely that you will not be able to gain access somehow although you may need special tools.
|
|
After you have carried out work on the equipment, it should be relatively straight forward to reassemble everything, more so if you made notes during the disassembly stage.
- if you intend to do a lot of modifications to a piece of hi-fi equipment, it will make things easier if you cut a large aperture in the bottom of the case to give access to the underside of the PCB(s). The aperture can be covered with a sheet of aluminium which can be bolted or screwed to the casing. The cover should be thick enough to restore the rigidity of the case when in position.
|
|
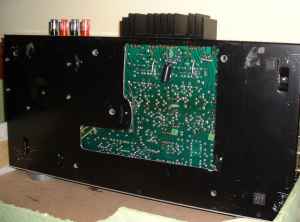 The aperture in the base of the amplifier allows access to the most often modified areas of the PCB without having to remove it from the casing.
|
| Site menu
Page menu
|
|
|
|
|
Before we go on to talk about replacing components, it should also be remembered that in some cases it is possible to improve on the original circuit design.
|
|
Avondale Audio specialise in modifying the circuits and components of Naim amplifiers so if you own one of those, they are definitely the people to speak to. Avondale also supply a comprehensive range of goodies for the hi-fi DIYer.
|
|
It is not possible to make specific suggestions here as what may be applicable to one design may not work in another. If you don't have any electronics training then you are going to have to try and find someone who does, and who can make specific recommendations, preferably based on their own experience with hi-fi.
|
|
As an example I will describe a modification which I made to my A&R A60 amplifiers which may be applicable to many other amplifiers. This is just to illustrate the sort of circuit improvement which may be possible and I will not be giving specific details. Anyone wanting the exact details of this modification is welcome to e-mail me.
|
|
The modification is to the power supply circuit and involves isolating the power supply to the driver circuit from that to the output transistors. Putting it very simply, one can and does have an adverse effect on the other so some method of preventing this is desirable.
|
This modification came from an article by Andrew Rothwell published in 'Common Ground' Issue 3.
|
|
The simplest method is to use an RC filter (this is an electronic filter made up of a Resistor and Capacitor, hence the name RC) to isolate each part of the circuit. The first problem to solve is where to insert the filters and this can be ascertained from looking at the circuit diagram, and then by identifying the corresponding tracks on the PCB. The value of components used for the filter will depend on the specification of the amplifier.
|
TRACK - The connections on a PCB which join the various components of the circuit to each other.
Usually made from the copper which is left behind after a PCB is chemically treated to remove the unwanted copper.
|
|
This modification could be taken a stage further by using a separate power supply (transformer, rectifier and reservoir capacitors) for each section. Improving the power supply to any piece of hi-fi equipment will almost certainly pay large dividends in terms of improved overall performance.
|
|
Sometimes a modification to the circuit can not be achieved by using the existing tracks on a PCB. In these cases, it is usual to cut the existing track (the very thin copper strips can be cut (carefully) with a sharp craft knife) and the new connection is then made using a piece of wire.
|
| Site menu
Page menu
|
|
|
|
|
If the piece of equipment you are working on is quite old, say more than ten years, then certain components like the capacitors may well need replacing due to age. Replacing old power supply reservoir capacitors with off-the-shelf new ones will probably result in a noticeable improvement. Some people recommend replacing old transistors although most other types of component, resistors, diodes and op-amps are not thought to degrade as much.
|
|
Of course, the real excitement comes when you replace a standard component with an 'audiophile' quality alternative and, hopefully, notice an improvement. Usually, you will replace a component with one of the same value, for instance a 100 ohm resistor with another 100 ohm. Sometimes the value may change, for example when using larger capacitors.
|
|
More importantly, from a safety point of view, you must always make sure that the replacement has an equal, or higher power rating than the component that it is replacing. Don't replace a resistor rated at 1 watt with one rated at .25 watts. And don't replace a capacitor rated at 35 volts with one only rated at 16 volts. Doing so is likely to result in the component exploding!
|
|
You should not replace a component with one of a different value unless you have been advised to do so by somebody who is competent in electronics and knows the circuit you are working on. Also remember, whether you are changing component values or not, that electronic components come in various shapes and sizes so make sure that the replacement part will physically fit into the circuit (preferably before you have ordered it from the supplier).
|
|
- if you are making a modification to a piece of hi-fi which requires that you fit extra components and you don't have enough room, try using Surface Mount (SM) components soldered to the tracks on the underside of the PCB. Just cut the track and solder the SM component over the break.
|
SURFACE-MOUNT components are designed to be more compact than their non SM equivalents. Instead of sitting on the top of the PCB with their legs soldered to the tracks on the opposite side of the board, SM components sit on the tracks. This makes it easier to solder them into position using mass-production techniques but more awkward using a soldering iron.
|
|
|
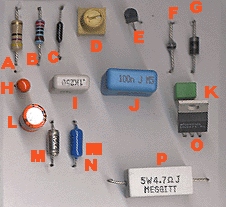
A = Carbon film resistor
B = Metal film resistor
C = Welwyn RC55 resistor
D = Trimmer
E = Transistor
F = Ultrafast soft recovery diode
G = Standard diode
H = Tantalum capacitor
I = Polyester capacitor
J & K = Polypropylene capacitor
L = Electrolytic capacitor
M = Polystyrene capacitor
N = Polypropylene capacitor
O = Voltage regulator
P = High power resistor
|
|
As this is meant as a tutorial for novices, here is a picture of some of the electronic components that you will be dealing with. I strongly urge you to find out as much about each of them and how they work before you start any modifications to your equipment (although it isn't imperative). To do so, try some of the links in the Getting the knowhow section.
|
| Site menu
Page menu
|
|
|
|
|
For this section, I will have to confine my advice to buying components for those of you living in the UK. If anybody from another country wants to compile a similar section, I will be happy to include it here too.
|
|
The sad truth is that it is getting to harder to buy electronics componets in the UK from the hobbyists point of view. The larger suppliers like Farnell and RS make things difficult with either minimum order requirements or expensive handling charges for small orders. Maplin, once a great source of everyhthing for the electronics hobbyist has drastically cut its lines as it mves to selling ready-made electronics items and computer equipment.
|
|
So, here are the options:
- Farnell - a large world-wide company. Usually better prices than RS. Minimum order of 20 UKP (before VAT). Large range and quick delivery. Request a (free) CD catalogue and you can browse at your leisure and even make up your orders offline.
- CPC - a branch of Farnell aimed more at the hobbyist. Smaller minimum order quantities but higher prices and limited range. Orders over 30 UKP are shipping-free.
- RS (formerly Radio Spares and not to be confused with the US company Radio Shack) - Another large company with a huge range of components.
- Maplin Electronics - still have some useful electronic components but watch out for shipping costs unless the order is over 30 UKP.
- Cricklewood Electronics - a smaller company specialising in those harder-to-find parts like obscure transistors. No minimum order charge and they keep their shipping costs reasonable to.
- Rapid Electronics - I find it difficult to locate items in their catalogue but list them here as an alternative.
- Audiocom - a small company specialising in the more exotic components but fairly expensive.
- The Hi-fi Collective - another smallish source of hi-end components.
- Strachan Electronics - another smallish source of hi-end components and hi-fi bits and pieces.
- Greenweld - offer surplus electronic items. Often worth a look but shipping costs will inflate prices on small orders.
Well, that's not quite all because recently I discovered a new company called Fast Components. FC are putting together component kits; and by buying from the Far East are able to keep their prices very competetive.
|
| |
|
They tell me that they are interested in the DIY hi-fi market and are hoping to put together a range of useful parts kits. Why is this useful? Well, if you buy stuff from Farnell like I do, you will see that for items like the good old 0.25W metal film resistor, there is a minimum order quantity of 50. So, if you want to buy in enough different values so that you have the correct one for most situations, it is rather expensive. You can buy kits form Farnell and RS but these work out quite expensive. Fast Components kits have fewer resistors but will enable you to have a wide range of values on hand. Belive me, there is nothing more frustrating than finding that you cannot complete a project for the want of a couple of resistors and you have to place a 23 pound order with Farnell just to get those resistors.
|
| Site menu
Page menu
|
|
|