|
Decibel Dungeon
|
|

|
|
The Behringer DEQ2496 has been around for a few years now (2010) and although primarily aimed at the PA market, it has found its way in to quite a few hi-fi systems. Whether it has a place in a high-end system is a matter of opinion, and a search around various hi-fi forums may leave the reader a little confused with the arguments for and against the DE2496. So I will state my position with regard to it and you can take it for what it is worth. I believe that it is a very worthwhile addition to a hi-fi system, and that it can make a serious improvement if used properly. Much will depend on how much your room affects the sound of your hi-fi of course.
|
|
By properly I mean that the DEQ2496 must be connected into the hi-fi system in the correct manner, and that means between a digital source and an external DAC. That way we avoid the ADC and DAC stages inside the DEQ2496 that are not (IMHO) up to hi-fi standard. Passing a digital signal into, and out of the DEQ2496 is the only way that I will recommend its use in a hi-fi system.
| ADC - Analogue to Digital Converter. DAC - Digital to Analogue Converter.
|
|
Second, the DEQ2496 should (make that must) be used in dual-mono mode rather than stereo. If you use stereo mode to correct the whole frequency range, the sound will be less clear, less transparent. Why? Because the correction for each channel will be compromised (unless you have a perfectly symmetrical room including the furnishings, windows, and doors etc. Lastly, the correct cables must be used to connect it to the hi-fi system, and I will give details of them in this article.
|
|
But to start at the very beginning (as DD is aimed at complete novices), what is the DEQ2496 and what does it do? Basically it is a piece of equipment that uses digital signal processing to 'change' or 'shape' the frequency response of a music signal. In fact, it can do so many things that it is almost impossible to list them all (even in the DEQ2496 manual) but the purpose that we are most interested in as audiophiles, is its ability to tailor individual frequencies, rather like those graphic equalizers that you have probably seen. But by doing the processing in the digital domain (instead of with the analogue signal), much less 'harm' is done. That's a very simple way of putting it but it should be a good enough explanation that won't confuse anybody. By being able to manipulate certain frequencies, we can compensate for 'problems' caused by the system, or more likely, by the listening room. For instance, the room that you are listening in will boost certain frequencies and cut others. This is what causes that bass boominess that a lot of systems suffer from. I originally used the DEQ2496 just to deal with the bass response of my speakers, and only used it up to 300 hz but it is arguably better used at higher frequencies. Now if all this sounds like magic, and too good to be true, I should provide a reality check and say that the DEQ2496 can't work miracles. If your speakers will only go down to say 40 hz, the DEQ can't make them go lower. If it tried to, your poor amp would have to work too hard, and your drivers would try to do things that they were never designed too. The result could well be damage to your system so don't go overboard when you use the DEQ2496 or you will regret it!
|
|
As I said, the DEQ2496 has a lot of tricks up its sleeve but we will concentrate mainly on it's EQ'ing abilities to begin with, or things may get a bit difficult to follow. EQ is short for equalise. What we are attempting to do is to boost the frequencies that are too low, and attenuate the frequencies that are too high. In theory we want to aim for a 'flatness' across the whole frequency range but in practice, making everything dead flat doesn't sound good at all. I'm quite sure that many of the users who have reported bad results using the DEQ2496 have not used it properly, and/or have tried to make everything dead flat. But before we start on the process of correcting the frequency response, let's take a look at how to set up the DEQ2496.
|
|
Please don't be put off by the length of the following instructions. If something is explained in detail, it is necessarily going to be a lengthy process (I've spent months putting this all together). In practice, it is much quicker to do, than to read about.
|
|
By the way, I must thank Thorsten Loesch for his notes on setting up and using the DEQ2496 that this tutorial is largely based on.
|
|
NOTE - if you get into trouble and want to reset everything to manufacturer's default setting, the procedure is to press the ON/OFF button at the same time as pressing the MEMORY button. You can also do a total reset by pressing the ON/OFF button while pressing both the MEMORY and COMPARE buttons.
|
| Site menu
Page menu
|
|
|
OK, so you have taken the plunge and bought yourself a DEQ2496. But what the hell do you do with it now? Look at all those buttons and knobs, never mind all the sockets on the rear panel. Don't panic, I'll guide you through it all. First off you will need the correct cables to connect it into your hi-fi system. The first of these is the cable that will connect your digital source, ie DAC, sound card, Squeezebox, USB converter etc, to the DEQ2496 (where it says 'AES/EBU in'). The cable must be a 75 ohm type coaxial, and the plug on the source end an RCA or BNC type depending on what socket is on the source (I prefer BNC and use them where ever possible). The other end of the cable will be attached to an XLR plug, the copper braid going to pin 1 of the XLR plug, and the centre conductor going to pin 2. You must then solder a 220r resistor between the copper braid and pin 1. The resistor should be a non-magnetic type for best results!
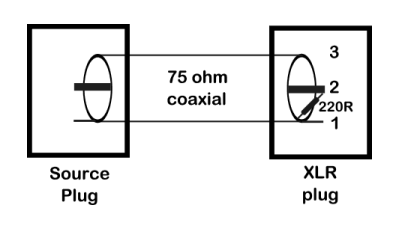
(In March 2016, I was contacted by somebody who found that the above wiring didn't produce a signal, and said that he rectified the situation by connecting the 220r resistor between pins 2 and 3. It is possible that later versions of the DEQ2496 had been wired differently, so if the above doesn't work, then try pins 2 and 3)
|
|
The output lead that goes between the DEQ2496 (where it says 'Out AES/EBU') and the external DAC is a bit more complicated so pay attention! You will need 50 ohm cable, and a very short length of 75 ohm cable. Use 50 ohm cable with the smallest diameter you can find because you have to get two lengths of it into a single XLR flying socket. I shaved some insulation of one side of each length so that they would more easily fit into the XLR socket. It doesn't matter that the copper braid from each cable contacts the other as they are electrically joined at that end of the cable anyway. Then you need a small box (and some suitable cable glands), I used plastic but you could use a metal one if you wish. The two lengths of 50 ohm coaxial cable go into the box through appropriately sized cable glands. Inside the box, the two centre conductors are joined by a 150 ohm non-magnetic resistor. Each end of that resistor is then attached to another 150 ohm non-magnetic resistor, and the other ends of the pair of 150 ohm resistors are joined by a single 91 ohm non-magnetic resistor. It actually sounds a lot more complicated than it is and the diagram below should make things a lot clearer. The short length of 75 ohm coaxial cable is then attached as shown in the diagram, again inside the small box and passing out through a cable gland. The other end of the 75 ohm cable is attached to either an RCA or a BNC plug, depending on what socket you have on your DAC. The 75 ohm cable must be as short as possible but not so short that it is difficult to plug into your DAC.
|
|

|
|
I hope that this won't put you off using the DEQ2496. These cables are not too difficult to make up if you can handle a soldering iron. In fact the hardest job may well be getting hold of the non-magnetic resistors. I had to order mine from Germany! I am assured that this is the 'proper' way to connect the DEQ2496 into the system and again wonder if those who have not liked the DEQ2496 used this method or not.
|
|
By the way, you could use the optical (TOSLINK) connections between your source, the DEQ2496, and your DAC if you prefer. Some users do prefer it citing that it prevents any electrical ground loops, but in practice, I prefer the electrical SPDIF connection, and have never had any problems with hum.
|
|


|
| Site menu
Page menu
|
|
|
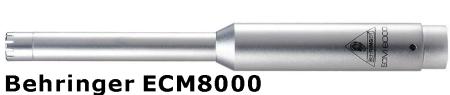
OK, so now you have got the DEQ2496 in your system and connected up between your source and your DAC and you could start playing with it. But rather than rely on your ears to make any corrections, it is far better to use the technology packed into the DEQ to make most of the adjustments automatically. To do that you will need a measuring microphone, and I find that Behringer's own mic (ECM8000) works perfectly well with the DEQ.
|
|
|
|
The ECM8000 is phantom-powered which means that is takes its power from the DEQ so you won't need a separate power supply. Make sure that you have a long enough cable to place the mic at the spot where you normally listen to the music. Then plug the mic into the socket marked 'RTA/Mic in'. You are (or should be) ready to use the DEQ for some serious adjustments"
|
|
|
| Site menu
Page menu
|
|
|
OK before we get stuck into the interesting bit there are a few things to do that will make doing the interesting things easier. So if you are sitting comfortably let's begin.
|
|
In theory the music should sound best when every frequency is reproduced a the same loudness. In other words, if we measured each frequency and drew a graph of the results, we would have straight line. But as I said above, if we actually achieved that flat response, it wouldn't sound as good as we may expect. So we are NOT aiming to equalise the frequency response to a flat line (on the display of the DEQ).
|
|
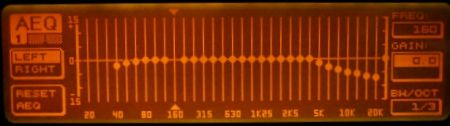
What we do instead is set a target curve (as opposed to a target straight line) and ask the DEQ to equalise each frequency to the target set on the curve. I know that many of you find all this talk of frequency response and target curves hard to grasp so let's have a 'look' at what we are talking about. The DEQ fortunately has a display as shown below.
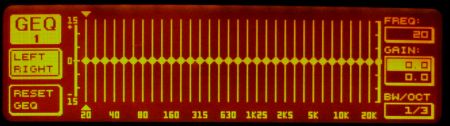
You should be able to read the frequencies along the bottom of the display (going from 20 to 20k hz) and the sound levels up the left hand side (ranging between +15 and -15 db), and the display is in the form of a graph. OK, if you are thinking that every frequency is set to 0db and that means no sound, that is not correct. In this context ) db means that the incoming signal will not be amplified or attenuated (in other words it is the same db (decibels) it comes in as with nothing added or taken away so it is unaltered).
|
|
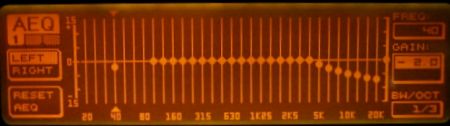
Now look at the next display.
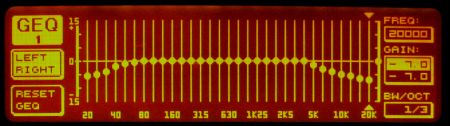
You should be able to see why we call this a target CURVE. Equalising the frequency response to something like this curve will sound much more to our liking (even though we will still tweak the response afterwards). So the first job that we will do is to set up the curve as a preset so that we can use it in the future without the need to set all the individual frequencies each time that we want to EQ the system. So here are the settings that you will need to enter.
|
|
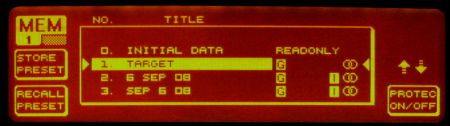
First of all press the MEMORY button and then using the large knob, select INITIAL DATA. Press the button next to RECALL PRESET and then the rectangular button B next to OK to confirm your choice. This clears any previous pre-settings and sort of gives us a blank canvas to work on.
|
|
Now press the GEQ button and you should see the following display.
This is what we want to change to the target curve.
|
|
|
|
If you turn the small round knob (shown by the red arrow above) you will notice that the little arrow on the top of the display moves horizontally over each frequency setting. Turn the knob so that the little arrow is over the setting market 20 (hz). Now turn the large round knob (anticlockwise) until you see the figure in the box marked 'GAIN' on the right of the display reads -5.5 (db).
|
|
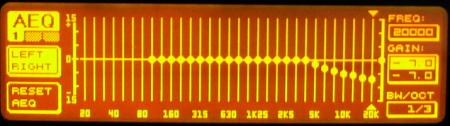
Move the little arrow to the next frequency by turning the small knob clockwise. It should now be over the setting marked 25 (hz). Using the large knob, again adjust the figure in the boxed marked 'GAIN', this time to -5 (db). And continue along the line until you have entered all the settings below.
|
| Frequency (hz) | 20 | 25 | 31.5 | 40 | 50 | 63 | 80-4000 | 5000 | 6300 | 8000 | 10000 | 2500 | 15000 | 20000 |
| Level (db) | -5.5 | -5 | -4 | -2 | -1 | -.5 | 0 | -1.5 | -3 | -4 | -5 | -5.5 | -6.5 | -7 |
|
|
By the time that you have entered all the settings, you should appreciate why we will save this curve as a preset so that we don't have to enter the settings every time that we want to do an EQ. And while we are on the subject of saving work, we can enter some other settings that will be saved in the same preset. So, go to the input menu page by pressing the small button marked I/O.
|
|
|
|
You should now see the input menu page that looks something like this.
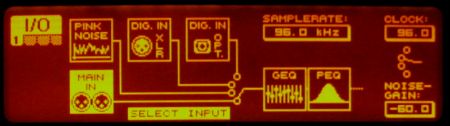
Using the large knob, make sure that you have MAIN IN selected. Now go to the Utility menu by pressing the small rectangular button marked 'UTILITY'.
|
|
|
|
You should now see the utility menu page that looks something like this.
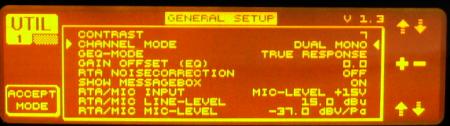
Check that you are on page one of the menu. If you are not, press the rectangular button to the top left of the display that is marked 'PAGE'. Using the small round knob (A) select the option marked 'CHANNEL MODE' and using the large round knob C change that setting to read 'DUAL MONO' (instead of 'Stereo Link'). And now press the button next to where it says 'ACCEPT' (or this setting will not be saved). We are now ready to save this preset.
|
|
|
|
Press the rectangular button marked 'MEMORY' to get to the memory menu page.
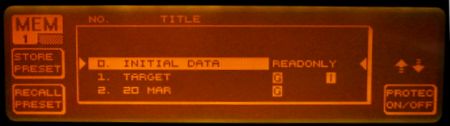
Use the large round knob (c) to select an empty slot on the list (or you can over-write an existing setting if you prefer). I use the second one down, immediately beneath 'INITIAL DATA'. Press the button next to where it says 'STORE PRESET', then the button next to where it says 'OK'. You can now give your preset a name (I call mine 'TARGET' but anything that you will remember as your target curve will be fine). This is done using the big round knob (C). Turn it to select a character and press it in to enter that character into the name of the preset. When you are done, end with a space character and then press the button next to where it says 'OK'.
Your preset is now saved and can be recalled each time that you want to do and EQ. When you want to recall this preset, press the rectangular button marked 'MEMORY' and then select the preset using the large round knob (C), and then press the button next to where it says 'RECALL PRESET' followed by the one next to where it says 'OK'. It's as easy as that!
|
| Site menu
Page menu
|
|
|
So now we are ready to actually do something with the DEQ. Begin by plugging the microphone into the rear of the DEQ. I am assuming that you are using the Behringer ECM8000 but any decent measuring microphone should work equally as well (check if it requires an external power supply though as the ECM8000 takes its power from the DEQ2496).
|
|
|
|
The mic needs to be placed as close as possible to where you normally sit to listen to the music. I made up a crude mic stand that allows me to place the mic over my listening seat at ear level.
 - You will obviously have the mic cable running across the floor while you do this job so take note of it and don't trip over it. - You will obviously have the mic cable running across the floor while you do this job so take note of it and don't trip over it.
|
|
|
|
Press the MEMORY button, select TARGET (or whatever name you gave to the target curve you set up earlier).
Press the rectangular button B to select the TARGET curve, and then again to confirm.
|
|
Next press the RTA button.
|
|
|
|
I read somewhere that if you try to equalise the whole frequency range in one go, you get problems with the fundamental frequencies of each range affecting the equalisation of the other ranges, particularly the bass affecting the higher frequencies (is this why the bass frequencies are not included by default?) So I equalize in two stages (well four because it is dual mono). I first equalise up to 125 hz, and then do the rest of the frequency range on its own. So first we will do the bass, from what ever is your lowest frequency, up to 125 hz. Remember, you can't equalize speakers that are designed only to go as low as 50 hz down to 20 hz because you will damage them!
|
| Site menu
Page menu
|
|
|
Equalising the bass frequencies
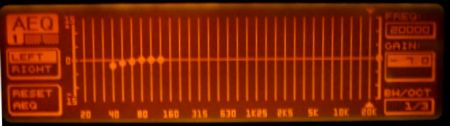
At this stage, you should have the following display.
The part of the target curve below 100 hz is not visible (at least not on my DEQ2496). Just to see that the curve is still there all the way down to 20 hz, turn the rotary knob A so that the little cursor arrow on the top of the display is directly over the 20 hz frequency. Press rotary button C and you should see a white dot (or circle depending whether you are doing the left or right channel) appear.
|
|
Let's suppose that your speakers can only go as low as 40 hz and you don't want to equalise below that, ie 20-31.5hz). So you don't want 20 hz to be in the EQ process so press RBC again to get rid of the dot. Now move the cursor arrow to the lowest frequency that you want equalised (which is 40 hz in our example) and press the rotary button C again.
This time a dot is displayed indicating that that frequency will be included in the equalisation process. Repeat the process for the next frequencies (50 hz and up to 100 hz)) and you should now have a row of dots representing the target curve but from only 40 hz and higher.
|
|
Now move the cursor to the 160 hz frequency, press the C knob, and instead of turning the dot on, it is turned off so that frequency won't be included in the EQ process. Get the idea?
Continue turning off all the dots up to 20K hz and you should have a display that looks like the one below.
|
|
With the target curve set up like this, press the rectangular button marked 'PAGE' to go to the next page.
|
|
|
|
I'm still not sure exactly what the 'ROOM CORRECTION' setting does but I always use it. It is easy enough to run RTA with and without Room Correction and see (or hear) which way you prefer it. For now, press the rectangular button marked 'B'
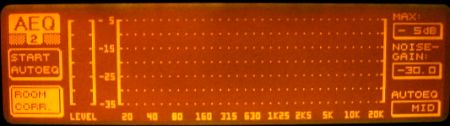
Then press the other rectangular button marked 'A' to start the EQ process.
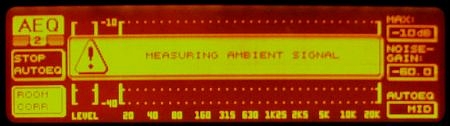
After a few seconds you should see a message stating that the DEQ is measuring the ambient signal.
If the ambient signal, ie the sound coming from your speakers, is not loud enough, the DEQ cannot correct it so it will display the following message.
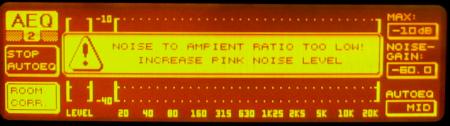
To do that rotate the large round knob 'C'. The pink noise will sound louder and if it is still not loud enough, the message is repeated and you should raise the volume a little bit more. (You may also need to increase the volume level on your amp) I find I usually end up with a level of around -30db on the DEQ. The pink noise should sound fairly loud, but not so loud it is frightening. It's best to turn it up in small increments until it is loud enough for the AUTOEQ process to begin.
|
|
When the level is high enough, the AUTO EQ process will start. To see what is happening you must press the PAGE button again.
|
|
|
|
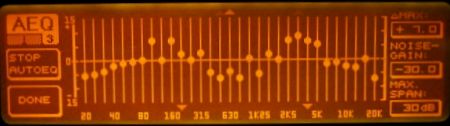
You should then see the target curve but with the dots or circles being moved up or down as the frequency curve is equalised. When they are being increased you will see a small arrow at the top of the display, and when decreased, a small arrow at the bottom of the display. If you have ever seen an automated recording desk in a studio, it looks a bit like one of those working.
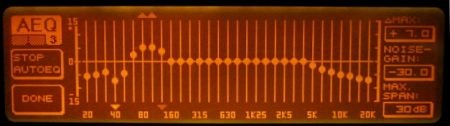
This process can go on for quite a while but you will get a feel for when to stop it by pressing the rectangular B button (next to where it says DONE). I usually wait until there is no movement in the sliders, or at least almost none, and then stop it.
|
|
|
|
Now press the PAGE button to start the EQ process again (for the other channel) .
|
|
|
|
IMPORTANT - press the rectangular A button to toggle the channel! And then repeat the process to EQ the bass frequencies for the other channel.
|
|
When you have EQ'ed both channels, write down the settings for your bass frequencies from the lowest to 125 hz. Don't forget to note which channel they are for too. You do that by pressing the GEQ button.
|
|
|
|
This is similar to what you should see.
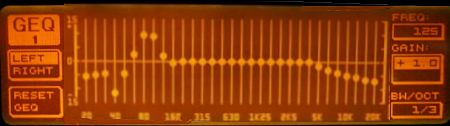
Move the cursor over the lowest (equalised) frequency (40 hz in our example) and read off the figure in the box marked GAIN, and write it down.
- the frequency is shown in the small box at the top right of the display marked FREQUENCY
- Don't forget to record the + or - as well as the number.
Move the cursor up one frequency, record the level, and repeat for all frequencies up to and including 125 hz.
|
|
After you have equalised the rest of the frequency range, I will show you how to manually adjust the bass frequencies using the figures that you have just written down.
|
| Site menu
Page menu
|
|
|
|
|
|
|
Press the MEMORY button, select TARGET (or whatever name you gave to the target curve you set up earlier).
Press the rectangular button B to select the TARGET curve, and then again to confirm.
|
|
|
|
Press the RTA button. Make sure that MIC RTA in is selected as the source. If not select it by pressing the rectangular button A.

|
|
Press the rectangular button marked 'B' to start the AUTOEQ setting up process.
Press the rectangular button B to go to the EQ set up page.
This time you don't need to edit the curve at all so simply press the PAGE button to go to page 2 of the AEQ menu.
Select the ROOM CORRECTION setting by pressing rectangular button B, then START AUTOEQ with the rectangular A button, and then repeat the process that you used to EQ the bass frequencies.
Then do the same for the other channel.
|
|
When you have EQ'ed both channels, press the GEQ button. Note which channel is displayed and enter the bass frequency settings that you wrote down earlier. To do that move the cursor at the top of the display to the frequency that you want to set, and then use the RTC to adjust the gain. Then move the cursor to the next higher frequency and enter that gain setting, and so on up to and including 125 hz. Do that for both channels.
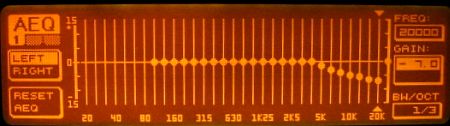
Now look at the frequency curve on the display. We don't want it to have any large spikes so we need to smooth it out a little. This bit is very much down to fiddling rather than measuring. I try not to have any greater difference between adjacent frequencies than 7 db so I adjust the sliders accordingly. After a bit of experience, you will get the hang of it. Here is the example EQ smoothed out a bit.
|
|
Still with me? Yes, it seems like a lot of work the first few times you do all this but believe me it does get a lot easier when you have been through it all a few times.
|
|
Now we are going to tweak the frequency settings to get a more favourable result. These adjustments are recommendations only, so try them, and only keep them if they make an improvement to the sound. Starting with the bass frequencies from the lowest to 125 hz add between 1 and 2 db of gain to each setting. Do the same for both channels (remember you select the channel by toggling the rectangular B button.
|
|
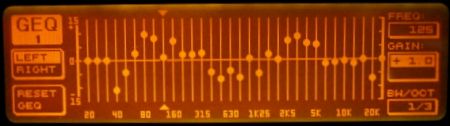
Now move the cursor to the 2000 hz frequency. Decrease the gain by one click of the round knob C. Move the cursor to the next higher frequency and decrease the gain by two clicks. Continue up each frequency increasing the number of clicks by one for each frequency band. Again, remember to do the other channel in the same way. Compare the display below with the one above.
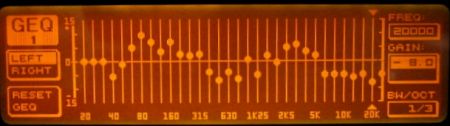
|
|
Now press the rotary button A. You will see the word FULL appear in the box at the top right of the display. This indicates that any adjustments to the gain will be over the full frequency range (and not to individual frequencies). Using the round knob C, adjust the gain to around -5 or -6 db. Do this for both channels (you will notice when you do the second channel that 'FULL' is already set). When you have finished and are playing music, keep an eye on the bar meters on the left side of the DE2496, and make sure that the sound is not clipping (red lights lighting up too much). If it is, then return to the GEQ page, and decrease the master gain for both channels.
|
|
|
|
You will be pleased to read that we have now done with the GEQ section. Next press the PEQ button.
|
|
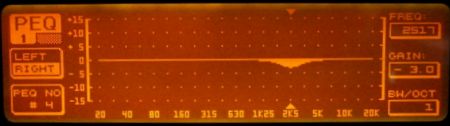
Move the cursor to the 2517 hz frequency. You can move the cursor in this section by either pressing the rotary knob C, or fine adjusting with the round knob A. With the cursor at 21517 hz, decrease the gain by turning the round knob C anti-clockwise until you have -3 db. Adjust the BW/OCT value to read 1 by rotating round knob B. This is known as the 'BBC dip'.
|
|
You can use the PEQ page to make other adjustments, eg further cutting the treble, or boosting the bass a bit more (if your speakers can take it). The key thing is to remember that you can experiment and see how the settings affect the sound of your system.
|
|
Now press the INPUT button (marked I/O).
|
|
|
|
When the input menu comes up, select the correct input using the round knob C. If you are using the XLR connection that is recommended in this article, select DIG IN XLR. If you are using an optical connection, select DIG IN OPT. Then press the rectangular button B to accept the input that you have chosen. Don't forget that part! Also remember that the input defaults to MAIN IN after you do an EQ so needs to be reset after or you will get no sound at all!
|
|
Now you just need to save these settings so you don't need to do all this next time you turn on the DEQ2496.
|
|
|
|
Press the MEMORY button, using the round button C, navigate to an empty slot in the menu (or one you don't mind over-writing) but don't over-write your TARGET settings.
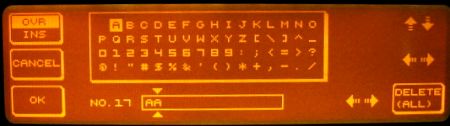
Press the rectangular button A to store your new settings, and you should see an on-screen keyboard that you can move around using either the round knob C, or the two smaller round knobs, A and B. It can be a bit fiddly till you get used to it but place the cursor over a letter, and press the round knob C to add that letter to the name of your settings file. Continue like that until you are happy with the file-name, and then press the rectangular button B to confirm the name and save the file.
|
|
If you want to delete a letter in the file name, use the round know B to place the cursor over that letter, move the cursor on the keyboard over the blank character, and press the round knob C.
|
|
Hopefully, you are all done now and it is time for some fun listening to your hi-fi.
|
|
|
|
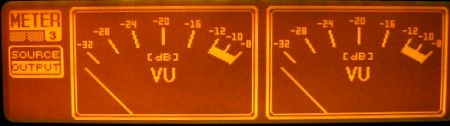
Press the METER button to return to the meter display, put aside the microphone. One word of caution though, BEFORE you play anything, check that you have set the meter gain in the GEQ section to around -5 db, and turned down your amplifier to a low volume setting. Now play some music and see how you like what the DEQ2496 has done.
|
|
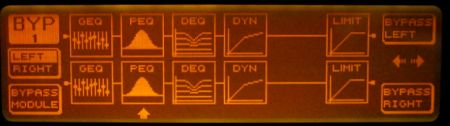
The above is how I use my DEQ2496 and of course your system, room, and ears will all be different to mine. You can play around with a number of the adjustments that we made above. For instance you can add different amounts of bass, or cut different amounts of treble. You can try without the 'BBC dip' that we made in the PEQ section simply by bypassing that module.
|
|
|
|
To do that press the BYPASS button, use round knob B to select the PEQ module, and then press rectangular button B to bypass it. (Remember to do both channels!)
I do suggest going through the whole routine above at least a few times even if you are quite satisfied with your initial results. Save the new results in a different slot and if you want to go back to the original settings you made, you just go to the MEMORY section and select those settings from the list.
|
|
That's about all I use from the vast list of tools that the DEQ2496 offers. I have played with the WIDTH settings but find that in practice, I don't need them. If I find any other useful tips in the future I will add them to this page. Perhaps if you discover anything useful, or any mistakes in what I've written, you would be kind enough to email me so I can include your input here for the benefit of everybody.
|
|
If you get no sound at all after running the AUTOEQ process, make sure that you have set the input correctly (I/O menu).
If you have a channel imbalance, you have probably made a change to one channel, and not replicated it for the other channel. Check all modules, ie DEQ, PEQ, and anything else you may have used.
A reader's tip
I received an email from Fred Bosick who suggests the following tip:
"What isn't obvious is that you can use the GEQ and PEQ at once. I noticed in your correction curve many up and down excursions. Your solution is to examine each band and reduce the difference between adjacent ones if they're too extreme. What you can do, instead, is to note the major trends and then create a couple of PEQ entries to neatly cover them. For instance, in my setup I created a third octave cut of 5dB at 50Hz, and a 1 octave boost of 3dB at 170Hz. THEN you redo the autoEQ and the resulting GEQ curve is smoother and you won't have to adjust it manually."
I have also been made aware of an alternative to the DEQ2496 which is a piece of software called Ultimate Equalizer, that runs on a PC and does the same job as the DEQ. You can read about it here.
|
| Site menu
Page menu
|
|
|